Find and Fix a Leak


|
|
Hi,
I have a leak in my Seahawk, which I’m trying to find. The boat is moored on a river and over the course of a week it will have water just over the cabin floor. Two weeks and the water is nearing the base of the cushions. This is irrespective of rainfall. I’ve taken her out of the water to find the problem. 1. There is no sign of ingress from the cabin roof/vents/windows/etc. 2. There is no sign of ingress from the cockpit lockers – if I lie on the quarter berths and look under the cockpit floor it all seems very dry 3. There are two through fixings under the waterline – a sink outlet and a water tap inlet (for sea water, I guess). Both “look” water tight and do not move. 4. There is no sign of obvious damage in the hull First question – when it fills with water I pump out the bilge under the small wooden inspection cover where the pivot bolt lives – is this the lowest point in the bilges which is a void? Second – my pivot bolt looks exactly like this… 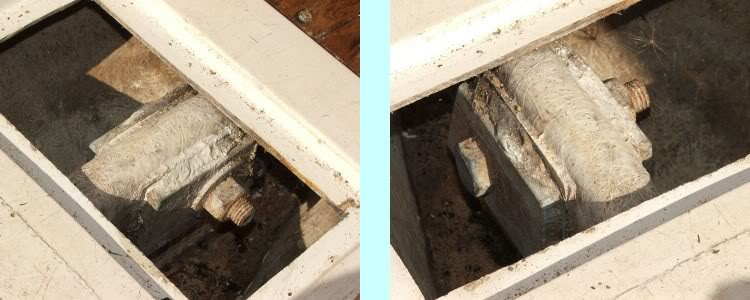 …except there are lines of “cracks”/splits along the top of the spacers. These could easily be “lifted” paint as this piece is under water every time the boat is left, but is my best guess for a leak. 1. What is this construction? It appears to be metal plate/wood packer/fibreglass tunnel/wood packer/metal plate? 2. I can test this joint by fixing a plastic bag over the entire structure and pumping some air in – if it won’t hold air then it will let in water? 3. Assuming it leaks can I:- a. Loosen (not remove) the pivot bolt – force sealant between the parts and then re-tighten? b. Just retighten the bolt – it’s not noticeably loose, but I’m worried that it might crush the fibreglass tube? c. Just apply repair fibreglass and resin over the structure from (say) the top of the bolt to the top of the nut? My gut says that c. is the most likely to work, and is possibly worth doing anyway… 4. The other candidate is the foot of the keel tunnel under the step. The very bottom of it appears cracked all the way around. When in the boat, after pumping out and sailing, the floor doesn’t show any sign of wetness, so I think it is less likely but I was thinking of widening the crack slightly and then repairing with a strip of fibreglass and resin all around the base/floor junction. Thirdly, I’m determined to test the hull anyway so my plan is to use polythene sheet to seal off the door/vents/cockpit lockers/sink plug/anchor chain tube and then use a leaf blower or compressor to create a low pressure input through the front hatch (obviously sealed around). If I do that, is there anything I’ve missed – the only problem would be if there’s a leak in the central keel tunnel? |
|
|
Hmmm - that's a big leak if you are getting that much water into the bilges in 2 weeks.
There might indeed be a leak through the pivot bolt fixings but that should be obvious when you have pumped the bilges dry. My boat doesn't have wooden packers between the plates and the glass tunnel. I replaced the bolt and plates with stainless, using a PU sealer (Sikaflex) between the plates and the tunnel. The bolt should not be overtightened as you can easily crush the GRP. My advice is to loosen the bolt right off, remove the wooden packers, dry it all off and put a good bed of Sikaflex under the plates - at least 4mm. Gently tighten down the bolt until it just touches the sealant and leave it a day to cure. Then tighten the bolt until the sealant is tightly squeezed, not totally crushed! Having said all that, the chances are that you will still have a leak. My experience with two Seahawks is that the bottom of the keel stub gets damaged to the point where cracks or small holes appear. Damage to the keel stub is often caused when the boat is retrieved on to the trailer, or when it takes the ground on rough stony moorings. This damage lets water into the ballast ( or more likely between the ballast and the hull) which then rises within the bilges. This happens because the grp wall between the ballast and the 'bolt chamber' was crudely made with thin grp and usually leaks. On early boats there was no wall, just a piece of soggy ply. The solution is to carefully grind off the surface of the stub keel bottom and either replace with filler in cracks and a thick gel coat, and/or fit a custom made shoe to the base, again with Sikaflex bedding. Obviously this can only be done when the keel and ballast are dry - it took my previous boat 2 months to dry off enough. It is well worth repairing the crack under the step. This crack often appears when a boat has taken the ground with the keel down and indicates that the keel tunnel has been forced sideways. I used some glass tape and epoxy resin around mine and it hasn't moved in 3 years. Personally I would take the keel out (easy job if you lift the boat onto a couple of 1 tonne bags of sand!) and examine the whole keel tunnel structure for internal cracks, especially where the tunnel joins the hull. I managed to fix a small one by grinding it out with a Dremel then filling the crack with epoxy - all done from within the keel slot. Nasty job but doable. Hope this helps Brian |
|
|
This post was updated on .
Hi Barry,
I agree with Brian. It is highly unlikely to be a leak around the keel pivot bolt. If you get that much water in the bilge after a week and don't see the area around the keel bolt weeping within an hour of drying it off then then that cannot be the source of such a major leak. I assume the crack you report looks a little like the one seen on the Issues for Buyers page although a worse case has been reported in a US-based boat by BillHawk. Unfortunately we have no report of the outcome of repairs to either boat. However, I agree with Brian that the most likely source of the leak is within the main concrete and scrap-iron filled keel and given the crack, very likely the plate slot. I'd follow his advice on how ro undertake the repair.
Greg Chapman
GregAfloat - My Boating Biography |
|
|
Hi Greg and Brian,
Thanks for the advice, although it sounds much worse than I hoped. I’ll continue to air test for problems, but less optimistic of finding an easy answer. If it is a crack in the plate slot, I don’t have access to any lifting gear so can’t easily get the boat off its trailer. It may be the case that I can raise the boat and lower the central keel rollers to give me enough access, but it’s a long shot. The crack is exactly as shown on the “Issues for Buyers”, and I see no problem with filling/taping over that with resin and mat. Cheers, Barry |
|
|
This post was updated on .
Hi Barry
I bought a couple of 2 tonne strops from eBay and asked my local farmer to lift the boat using his front loader on a big tractor. It all went very smoothly - we lowered the boat on to two dumpy bags of sand borrowed from the local builder. I had the keel out in an hour, sent it off for sandblasting, then sorted the crack inside the keel housing using a Demel and some epoxy. The boat had previously dried off for 3 months so the epoxy adhered properly. Painted the keel with 4 coats of POR15 paint (I use this on classic car chassis) and had the whole thing done in 3 days. Result - no leaks and the keel is still clean after 3 years. I sail on the sea so it's a real test of the keel paint. BTW - I've just treated Mustang to a new mainsail from Jeckylls - keen price, awesome customer service and top quality! I should now be able to give the Shrimpers a run for their money ;) Brian |
«
Return to Help Desk
|
1 view|%1 views
| Free forum by Nabble | Edit this page |