Examples of rigging


|
|
Hi,
Can anyone help me with either diagrams or example pictures of rigging? I have a late reedcraft/early moores seahawk, and the rigging that was on the boat when I got it didn't. Look quite right. I am replacing bottlescrews with dyneema for the shrouds, but my forestay is all wrong. It's a halyard going to a fixing at the top of the pulpit, and a roller reefing drum going down to the forestay anchor point, and a bit of a mess of what looks like meccano holding it together. Any suggestions or pictures would be reall useful. I am also wondering if I could replace all the shrouds and stays with dyneema and get rid of the steel wires altogether. Oh yes, and I need to re-rivet the spreaders etc, cos they are all loose. Any suggestions? Thanks Perry |
|
|
This post was updated on .
Hi Perry,
My best guess is that Piccolo is an early Reedcraft boat. Although she is fitted with Moore's style jib winches, they would seem to be a retro-fit to go with the furling genoa now has. Apart from Reedcraft-type cockpit lockers, admitted now known to have been fitted to the first few Moore's boats, she has the original Reedcraft jamb cleats on the cabin and the lower style cockpit guard rails. These two factors suggest she would have been a Reedcraft boat with a sail number below around #240, but to your question... First, have you checked out the rigging page at: https://www.seahawk17.org.uk/boat-description-rigging.php Reading through it I realise that it is short on photos and information on forestay arrangements, but does show accurately how Reedcraft shrouds would have been fitted. Indeed the photograph of the shrouds shows the Dyneema cord tied by the very Jeckells employee who claims to have rigged almost every SeaHawk ever produced! My own view would be stick to the original sail plan, use stainless shrouds and forestay, and only use landyard to secure them to the chain plates. That is a home-brewed arrangement. I'm not familiar with the detail of the standard arrangement for the furling genoa, and the best photo I have of one is not ideal for this purpose as it shows a Moore's boat with a much smaller genoa than the one most commonly seen... 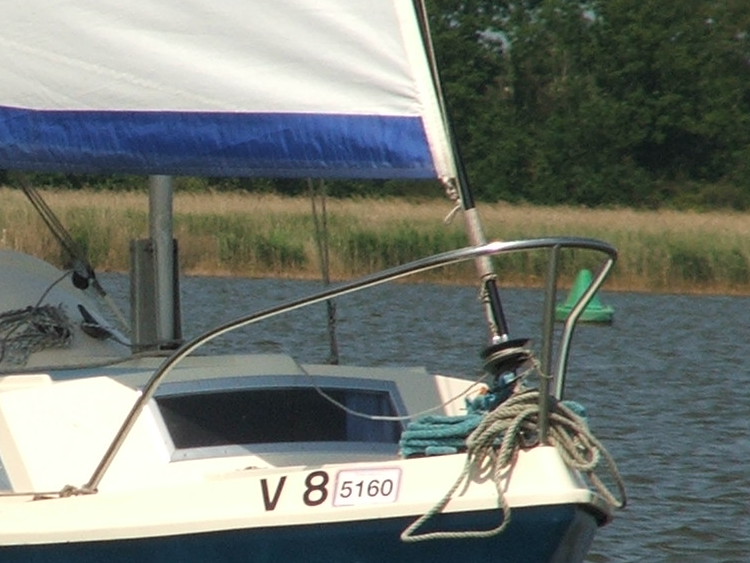 In this case it appears that the forestay is secured to the furling drum and both, together with the strop that is fastened to the sail, are all rotated together. I believe that that the larger genoa that is the norm is it attached direct to the furling drum and also suspect that the forestay is dispensed with altogether. It would be good to have confirmation of this from someone with a Moore's built boat with genoa. Unfortunately, neither do I have a good photo of the standard Reedcraft arrangement for a simple hanked on jib.  In the photo above the boat has a forestay that is shorter than standard, by some nine inches, and the boat is half way through a conversion to a block and tackle arrangement to ease lowering of the mast. In the standard configuration, a lanyard would secure the forestay to the shackle seen here, while the strop from the tack is shackled to the the empty hole seen further aft. As mentioned above, I'd stick with stainless steel, but then I replaced the ill-fitting bottlescrews found on my boat when purchased, and deliberately "restored" it, to use the original rigging techniques. I'm assuming that you have the standard mast for your vintage of boat. In that case... Don't! Unless you refer only to the fittings that attach them to the mast. The spreaders are deliberately left loose and fitted to the brackets on the mast only with split pins. When I had the standing rigging replaced by that Jeckells rigger, he was entirely happy with the way the arms moved about in the brackets fitted to the mast. However, when I pointed out that the end caps on the spreader arms were "welded" to the arms themselves, because of corrosion between the two metals used, he advised me not to bother try to "unweld" them. He even suggested that I snap off and file away the now redundant split pins that we supposed to keep them in place, as there was a risk of their sharp ends fraying the sail fabric.
Greg Chapman
GregAfloat - My Boating Biography |
|
|
Greg, thanks for the incredibly detailed response.
So, to run through a few things. I will pull the mainsail out in the next day or two and see what number it is. I have a sneaky feeling that piccolo is actually right at the crossover between reedcraft and moores, since it has (as you said) reedcraft lockers, but the previous owner had the flyer that came with it, and its a moores and sons flyer...of course, there is no knowing if this actually was picked up at the same time as the boat. I'll take your suggestion regarding the wire stays, though I do want to fit some shackles at the top so they can be removed for storage easier. I used to do this with my dinghy, and just mark port and starboard shrouds so I didn't swap them over when refitting them. I'll also have a play with the genoa. Do you happen to have a picture of the top of the genoa, where it attaches to the mast? I think the one on mine has been put in place later...again, I will take some pictures to see if I can make more sense of it. With regard to the spreaders, its not looking good. The base plate (fixed to the mast) is slightly deformed and the rivets connecting it to the mast are all loose.i would have expected these to be a tight fit. I d agree that the spreader to base plate should be a loose fit, and interestingly mine were affixed with bolts and nylon nuts (definitely original ones) rather than split pins, but are free to move back and forth to align as the shrouds tighten. Maybe I misunderstand, but would you expect the base plate to be tight to the mast? Anyway, many months/years of work to keep me busy here, so expect a lot of posts. Thanks for all the help. Perry |
|
|
Hi Perry,
I'm guilty of visiting shows and collecting brochures about the current model of things I already possess so, as you say, a Moore's brochure doesn't decide the issue, any more than a sail number. There are a couple of cases known where people have obtained second hand sails with recent numbers when owners of newer boats have replaced their sails. As you may be able to make out from the photo. The standard fitting is a "pin" with hole that takes a split pin, drilled through the end (I forget the technical name). More secure than a standard shackle, though at the cost of needing a new split pin each season. Unfortunately, No! So would I! I can't make out from the photos I have of Piccolo if she has the same type as mine, but it doesn't surprise me if they changed slightly over the years even when from the same manufacturer, and that definitely changed through production. The more the merrier!
Greg Chapman
GregAfloat - My Boating Biography |
|
|
Hi Perry,
firstly thanks for your welcome to the fold! Regarding Dyneema for shrouds and forestay, I do know of one Broads river cruiser with an enormous spread of sail using Dyneema for all standing rigging and works very well. Apart from the weight saving, (probably insignificant on a Seahawk), is has less stretch than wire and gentler to handle. The jib furling usually consists of a luff spar with slot for the sail, which the forestay runs through, a top swivel which the halyard attaches to, and a bottom drum which the furling line runs round. The forestay comes out the bottom and is then either attached to a bottlescrew or a stainless plate which in turn attaches to the stemhead fitting. On a couple of boats I've worked on, I designed an 'A' frame which has a prong on the end of it which has a pin and 'R' clip attaching it to the stainless plate. A simple block and tackle attaches to the bottom of the frame and by releasing the plate from the stemhead fitting the tackle can be played out to lower the mast. Once down, the 'R' clip is released, the frame and luff spar are lowered to the deck. If you know what I mean! cheers Mat |
«
Return to Help Desk
|
1 view|%1 views
| Free forum by Nabble | Edit this page |